Single Leg Training: “Offloading” For Success
I just landed in London, UK to get ready to teach a whole new continent of trainers in the Post Rehab Essentials stuff I do once in a while, but in spite of that I have an awesome guest post for you today from James Cerbie. I think you’ll enjoy it a lot.
I hate single leg work. With a passion.
Why do I hate it, you ask? Because I’m not very good at it.
I’ve spent the vast majority of my life, up until about two years ago, playing an incredibly imbalanced sport (baseball) and hammering bilateral work when I lifted (squats and deadlifts).
On rare occasions, I would throw in a lunge, split squat or step up variation. But, the vast majority of my effort went towards bilateral movements because that’s what I was better at.
Luckily I’ve grown out of this phase and truly appreciate the benefits brought about by single leg exercises. Unfortunately, if you’re anything like I was for the first 22 years of my life, then you’re lunge pattern probably isn’t too hot.
And by not too hot I mean one leg tends crush it, while the other (see picture below), performs about as well as the Detroit Lions did back in 2008 (hint: they went 0-16).
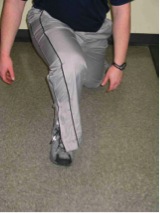
Photo Credit: Mike Robertson
Fortunately, there’s a workaround to this and I’m here to teach you a little “trick” you can use to get in better positioning.
Why Does This Happen?
Before we get into the exercise stuff, I’d like to give a quick background on why you’ll see so many people crush a lunge on one side and then crash and burn on the other.
(Side note: what I’m about to describe is far more prevalent in right handed individuals than left, so just keep that in mind as you’re reading.)
Although there are many possible reasons, one of the biggest is because people tend to stand like the sexy beast in the picture below:
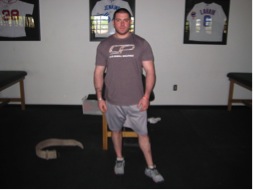
Photo credit: Eric Cressey
Notice how he’s adducted and internally rotated on his right side, and abducted and externally rotated on the left. If you’re familiar with the Postural Restoration Institute at all, then you should know this tends to happen because we are naturally asymmetrical.
The right side of our diaphragm is larger, has more attachments to the spine, has a larger central tendon and has the ability to lever off our liver. This simply means we tend to use our right diaphragm more than our left, which pulls our lumbar spine and sacrum into a more right oriented position (aka a more adducted and internally rotated position).
If an individual tends to live in this pattern, how would you expect their lunge to look on their right side? The vast majority of the time, approximately 97.5% of the time to be exact (I made that up), they’ll fall back on their most comfortable position: adduction and internal rotation (see picture at beginning of article).
In addition, people tend to have a dominant plant leg. For example, I’m right handed and throughout my baseball career always planted with my left leg whenever I threw or hit. It should come as no surprise then that that side is way better at stabilizing positioning. Just think about it, it’s had millions of reps where I’m crashing hard into adduction and internal rotation, which forces the external rotators, core etc. etc. to work like crazy to decelerate my body. Thus, it’ll be far superior at performing a lunge than my “off-side,” which gets minimal attention.
Although there are thousands of other reasons why somebody’s lunge pattern may be “imbalanced,” I’ve found the above to be two of the biggest culprits.
The Solution
With all of that in mind, how would you attack fixing the tendency to fall into internal rotation and adduction?
To put it simply, you need to increase the recruitment of your hip external rotators.
This should make logical sense: if I’m falling into internal rotation, I need external rotation to pull me out. Granted, that’s a little simplified but it holds true nonetheless.
A great way to accomplish this is to offset the load.
For example, take a look at the video below of a 1-arm 1-leg KB RDL:
[embedplusvideo height=”365″ width=”600″ editlink=”http://bit.ly/1gSPelN” standard=”http://www.youtube.com/v/GBSP5XL1RdM?fs=1″ vars=”ytid=GBSP5XL1RdM&width=600&height=365&start=&stop=&rs=w&hd=0&autoplay=0&react=1&chapters=¬es=” id=”ep6879″ /]
The load on my right side is attempting to drive internal rotation and adduction, which then forces my left hip external rotators to work like crazy to prevent that from happening.
Another option is to hold more weight on one side vs. the other (excuse my wobble on the second rep):
[embedplusvideo height=”365″ width=”600″ editlink=”http://bit.ly/1gSPktH” standard=”http://www.youtube.com/v/wUVRrYz9lDM?fs=1″ vars=”ytid=wUVRrYz9lDM&width=600&height=365&start=&stop=&rs=w&hd=0&autoplay=0&react=1&chapters=¬es=” id=”ep1114″ /]
Here are a few other variations that accomplish the same thing:
1. 1-arm DB Reverse Lunge
[embedplusvideo height=”365″ width=”600″ editlink=”http://bit.ly/1gSPpNT” standard=”http://www.youtube.com/v/Q8IFMeZQz9I?fs=1″ vars=”ytid=Q8IFMeZQz9I&width=600&height=365&start=&stop=&rs=w&hd=0&autoplay=0&react=1&chapters=¬es=” id=”ep9145″ /]
2. 1-arm Front Rack KB Reverse Lunge
Side note: the front rack position is a better option for someone who is yanked into scapular depression.
[embedplusvideo height=”365″ width=”600″ editlink=”http://bit.ly/1gSPtNH” standard=”http://www.youtube.com/v/tFFucT8t6ek?fs=1″ vars=”ytid=tFFucT8t6ek&width=600&height=365&start=&stop=&rs=w&hd=0&autoplay=0&react=1&chapters=¬es=” id=”ep4409″ /]
3. 1-arm DB Step Up
[embedplusvideo height=”365″ width=”600″ editlink=”http://bit.ly/1gSPzoC” standard=”http://www.youtube.com/v/jv2l44MwscE?fs=1″ vars=”ytid=jv2l44MwscE&width=600&height=365&start=&stop=&rs=w&hd=0&autoplay=0&react=1&chapters=¬es=” id=”ep6061″ /]
4. 1-arm KB Front Rack Step Up
[embedplusvideo height=”365″ width=”600″ editlink=”http://bit.ly/1gSPEbF” standard=”http://www.youtube.com/v/0ItMHLEkZGM?fs=1″ vars=”ytid=0ItMHLEkZGM&width=600&height=365&start=&stop=&rs=w&hd=0&autoplay=0&react=1&chapters=¬es=” id=”ep5917″ /]
Ultimately, you can apply this strategy to just about anything, so use your imagination and have some fun with it.
Closing Thoughts
When it comes to programming these movements, I personally like putting them in as accessory work on lower body days for 3-5 sets of 8-12 reps per side (I’ve gone as high as 15, but that just sucked) or at the end of a warm up for a light 8 reps per side.
Due to the nature of these exercises, you’re not going to be able to load them up like crazy, so feel free to include them often. It’s not like they’re going to crush you and prevent you from recovering.
Along those lines, movement and form takes precedence over weight. Don’t try and go so heavy that you fall back into your faulty motor pattern. This does you no good. Go as heavy as you can with good form, and then progress as needed. This is more about good movement than building strength.
That’s about all I’ve got for today, but I hope you enjoyed the article and post any questions or comments you have below.

James Cerbie, CSCS, Pn1, USAW, Crossfit Level 1
James Cerbie is a certified strength and conditioning specialist, Precision Nutrition level 1 certified, USA weighlifting sports performance coach, and Crossfit Level 1 certified. He has been blessed to work with athletes from the middle school to professional level, powerlifters, olympic lifters, and Crossfit athletes alike. At the end of the day, James gets no greater enjoyment than seeing people improve, succeed, and achieve their goals. He’s the owner of Rebel Performance and currently works as a strength and conditioning intern at Cressey Performance.
Come hang out with James on Facebook, Twitter, or drop him a line at Rebel Performance.
For more information on how to work in different corrective and strength options, as well as how to fix most common gym pains and problems, check out Post Rehab Essentials V.2.0 now
The 12 hour video series is becoming one of the go-to resources for trainers looking to work with common issues and injuries, as well as learn more about anatomy and biomechanics, plus how to train through and around almost any problem.
Click HERE for more info and to get your copy
9 Responses to Single Leg Training: “Offloading” For Success