The Low Down on Levers
It’s amazing to look back at my high school physics class and think that the stuff I learned there is what I do all day. Calculus? Nada. Social Studies? While learning about Canadian history has its place, I can’t think of the last time I thought about John Deiffenbaker or John A. MacDonald.
Physics is another thing altogether. Pretty much everything I do in a gym setting with my own training and with my clients is based on applications of physics. In listening to Louie Simmons talk, he says he doesn’t get coaches to come and talk at his facility any more. He asks physicists and biomechanics professors to come so he can learn more about the principles of what he does and how they work or could work better.
One of those principles is leverage, and to a similar degree torque. The downside is that the majority of people in gyms or even who work as trainers don’t understand these concepts enough to know how to use them to their advantage of a daily basis. Sure, effort in the gym is important, but using effort with poor mechanics and use of your own built in levers is going to limit performance.
Today I wanted to talk about the basics of leverage and how you can use this information today to help you lift more weight in a safer manner, and also make you the talk of every cocktail party you attend, because everyone loves hearing about torque, vectors, and all that cool stuff.
Torque and Mechanical Advantage
Torque is a measurement of the amount of force required to rotate an object around a fixed axis. Think of the movement of the elbow during a biceps curl. The amount of force required for the biceps to exert on the forearm with a load in the hand in order to make the ulna rotate around the humerus is a measurement of torque, and can be classified based on the length of the levers, and the relative distance of the load and the force application to the axis of rotation (the joint).
Torque measurements are greatest when force applications are at 90 degrees to the axis of rotation. Think of pushing against a door. When you push against it perpendicular to the face of the door, or moves relatively easily, especially compared to if you were to push it at an angle not flush.
When you’re lifting a challenging weight, the sticking point is typically the point where the greatest application of force is required, or when the angle of force application is 90 degrees to the axis of rotation.
Torque is measured in force x distance, a unit known as a Newton-meter. This means the product of torque is dependent on the amount of force required to move an object a specific distance. Torque and work are commonly used interchangable, although the difference is due to linear movement for work and rotational movement for torque. For instance, if lifting 500 pounds in a deadlift a height of 1 meter, the work required is considerably less than the work required to clean and press 300 pounds to a height of 2 meter.
Mechanical advantage is a measurement of the force required to lift an object relative to the size of that object. For instance, an application of 50 pounds of force to move a 100 pound object by using some lever as mentioned later, means you can move an object that is twice the weight of the force applied, which gives a mechanical advantage of 2.0. Compared to a force application of 70 pounds to move the same 100 pounds by altering the lever system, which relates to a mechanical advantage of only 1.42.
Determining the mechanical advantage is pretty easy. It’s as follows:
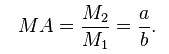
where MA is mechanical advantage, M2 is the force output (load lifted), M1 is the force input (muscle force), a is the length of the lever attached to the output and b is the length of the lever attached to the input.
You can alter the mechanical advantage by simply altering the length of the levers attached to the output and input. A short arm on the output coupled with a long arm on the input, like in a very long crowbar, produces a greater mechanical advantage and reduces the force needed to move a weight.
Levers
There’s three common classes of levers, all composed of 4 basic features: a load to be lifted, a force imparted to lift the load, a fulcrum or pivot point, and a lever attaching all these things together. The different categories are dependent on where the load is placed relative to the force and fulcrum. By altering the placement, you can alter the mechanical advantage, or the amount of force required to move a load relative to the size of the load. The length of the lever also disctates this mechanical advantage, which we’ll see further down. First let’s look at the types of levers.
A first class lever is essentially a teeter totter. The fulcrum is placed between the load and the force.
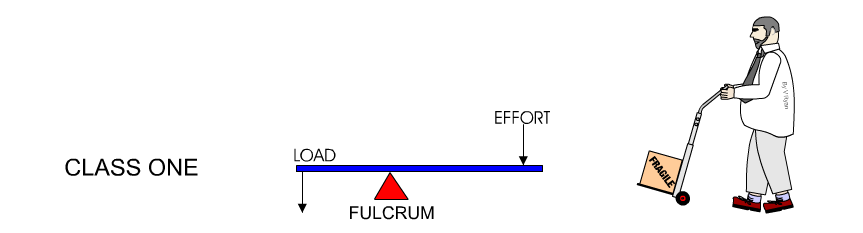
The benefits of this class of lever is you can increase the amount of load you can move simply by extending the length of the lever where your effort is applied. A crow bar works on this principle, and the amount of force required when using a longer crowbar compared to a shorter crow bar is dramatically less.
Some may say that the calf muscle would act as a first class lever, as the foot is the resistance and the fulcrum is the ankle, but in reality it’s more of a class 2 lever, discussed below.
A class 2 lever has a load placed between the fulcrum and force application. This is classically shown as a wheelbarrow.
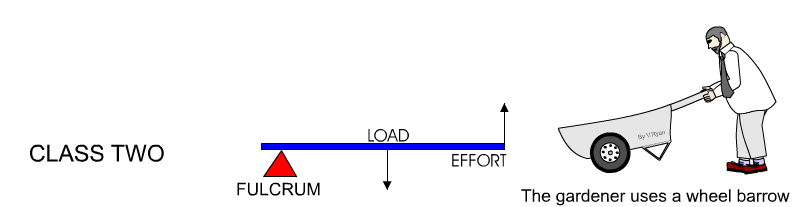
The mechanical advantage to lifting here is less than in a class 1 lever, but it has a similar benefit to having a longer lever length in that you can apply much less force with a longer lever than with a shorter lever.
The calf muscle operates as a class 2 lever as the pivot point is the ball of the foot, the resistance is the weight loaded through the ankle and the calf is behind the resistance in terms of the fulcrum.
Class 3 levers involve placing the force application between the load and the fulcrum.
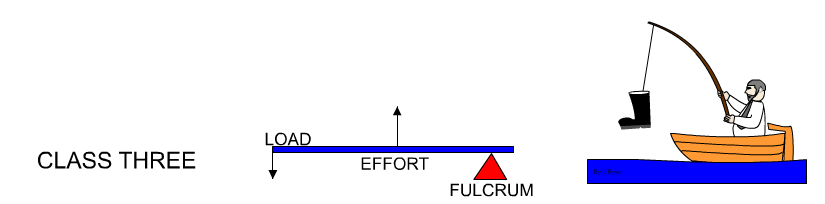
Most muscles in the body work on this class, which is a much more economical, space saving, and velocity producing system compared to the others. This system requires a much greater force application to move a load, but the load can be moved a much greater distance relative to the force application. For instance, when throwing a baseball, the muscles of the shoulder will only contract a small distance, but the arm will move through a very large range of motion by comparison. The length difference helps the arm to move upwards of 7200 degrees per second during a 90 mile an hour fastball.
So how does all this apply to lifting weights?
Knowing how to adjust a position can help to reduce the lever length acting on the object being lifted, increase the lever length of the force application, increase the mechanical advantage, and make the movement easier at the same weight. This means you can start throwing around more plates than a Greek wedding, all while reducing the strain to vulnerable areas of the body.
Let’s look at a deadlift first.
The conventional set up for a deadlift involves a few key points: starting with the weight relatively close to your legs or almost touching, hinging from the hips and maintaining a fairly straight and rigid spine. Torque is only conserved when the lever is rigid, so having enough spinal stability to resist deformation from the weight is very crucial to the execution of the lift. More advanced lifters can retain rigidity of the spine when in a nearly fully flexed position, which reduces the distance the hips have to move the weight, and decreases the amount of torque required.
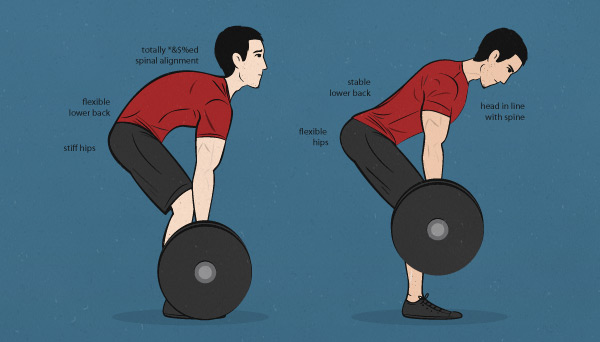
Pic by Marco Walker-Ng featured here: http://bonytobeastly.com/getting-jacked-by-standing-up-straight/
The bar placement close to the legs reduces the lever length from the fulcrum (feet) to the load, which reduces the amount of force required to lift the weight. Some coaches say you should think of shaving your legs with the bar to ensure the weight stays close, but I prefer to avoid bleeding all over the place for no good reason, so having the bar slightly off the shins (a few millimeters) will do.
You can reduce the lever length acting on the resistance further with some positional aspects. Trying to get your shoulders down into your back pockets reduces the distance from the shoulder joint to the pelvis, which in turn decreases the lever arm length acting on the object being lifted and helps improve the mechanical advantage of the lift. A downside to the round back deadlift is the length of this lever is increased the further the spine is flexed and the shoulders are protracted, which makes the pull much harder as an end result. This double-edged sword of reducing the distance to pull but increasing lever length is sometimes negated by brute force.
A sumo deadlift provides the benefit of getting the weight closer to the center of gravity (which is also in many ways the axis of rotation of a movement), which reduces the force arm acting on the body. This is accomplished by externally rotating the hips and having the length of the femur that dictates the distance from the weight to the center of gravity essentially reduce. This also allows the individual a chance to have a more vertical torso, which again reduces the lever arm length acting on the weight.
http://bonytobeastly.com/ectomorph-weightlifting/ for an awesome article on lifting mechanics for skinny guys.
To get a load even closer to the center of gravity, a Jefferson deadlift could be an option, as you wind up straddling a bar and positioning yourself over top of the weight. This is one of the more leverage-inducing variations due to the positioning of the weight over the bar, but is somewhat awkward to learn in initial stages.
[youtuber youtube=’http://www.youtube.com/watch?v=N1LZA-EB8mE’]
As mentioned earlier a major concept with torque is the maintenance of a rigid lever on which to apply force into an object to be moved. In the deadlift, that lever is your spine, and if it’s not rigid, well, you’re probably going to have a disc explode all over the back wall, so developing a level of stabilization is important. You can do this with abdominal bracing, as well as with breathing control.
Doing a hard and deep inhalation prior to pulling, then bearing down on it like you’re in the bathroom going to war on your colon helps to increase the intra abdominal pressure, which creates a kind of expansive pressure through the core. When the intra abdominal pressure pushes out and the abs push in, it creates a zero movement system which is resilient to deformation. This stiffness allows for a greater transfer of force from the hips through the spine and into the object being dominated like Aaron Hernandez when he gets the bottom bunk.
[youtuber youtube=’http://www.youtube.com/watch?v=KMOKueeNiPk’]
In closing, to lift heavy stuff, get it closer to your center of gravity, make your spine stiff and short, and brace through ab contraction and breath control. It seems simple enough, but as with anything the devil is in the details. Working on the fine tuning of these simple biomechanical concepts and principles of physics can help people recovering from spinal injuries, hip dysfunctions, core surgeries, and also help increase performance outcomes in elite athletes without fail. We all fall to the laws of physics, so understanding them helps produce better results, no matter what the goal and no matter the individual.
20 Responses to The Low Down on Levers