5 Unconventional Exercises to Improve Your Pull-Ups
Today’s guest post is from Meghan Callaway, a regular contributor here, and the author of the Ultimate Pullup Program. It’s even on sale until October 27th at midnight for half price ($47 instead of $97)
*****
Pull-ups are one of the most empowering and badass exercises you will ever do. In order for pull-ups to be performed to perfection, the entire body must be operating as a synchronized unit. Due to many reasons, including overusing the arms and underusing the muscles in the back, failing to control the movement of the scapulae, lacking lumbo-pelvic stability, and possessing a weak grip, countless people fail to excel at pull-ups. I am not just talking beginners.
Here are 5 unconventional yet effective exercises that will help you step up your ability to perform pull-ups.
#1) Renegade Rows From Bear Crawl Position
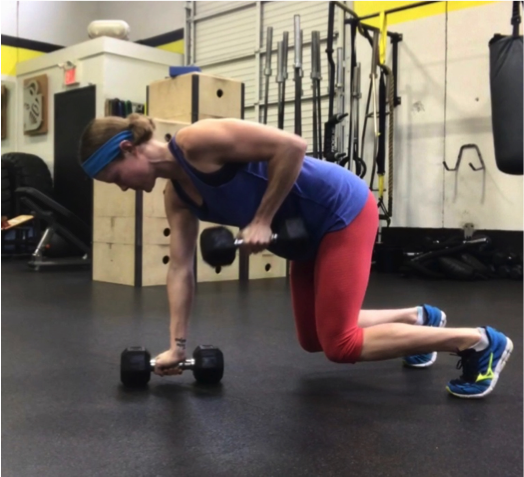
This exercise develops lumbo-pelvic stability, shoulder and scapular controlled mobility (on the side that is moving), shoulder and scapular stability (on the side that is planted), and upper body strength.
Coaching Tips:
- Get into a bear crawl position. Your head, torso, and hips should be in a stacked position.
- Place your thighs so they are in a vertical position, bend your knees, and keep them a few inches above the floor.
- Your shoulders should be above your hands.
- Before each rep, take a deep breath in (360 degrees of air around the spine), brace your core (360 degree brace), tuck your ribs towards your hips, and squeeze your glutes.
- Perform a row, and initiate the movement by using the muscles in your mid and upper back and draw your shoulder blade in towards the spine (retract). Do not initiate the movement with your arm, and do not use momentum.
- Do not allow your elbow to flare out; instead keep it close to your side.
- Lower the weight with control. During the lowering/eccentric component, do not keep your shoulder blade pinned. It is meant to move, and should perform the reverse movement (protraction) as it did during the rowing/concentric component.
- In terms of your shoulder/shoulder blade on the planted side, do not mindlessly hang out. Press your body away from the floor and protract your shoulder blade (moves away from the spine).
- For the duration of the exercise, your head, torso, and hips should remain in a stacked position. Do not let your lower back hyperextend, ribs flare, torso or hips rotate, weight shift from foot to foot, and do not let your hips pike or collapse.
- Aside from the rowing arm/shoulder blade, your entire body should remain in a fixed position.
Regression:
Make this exercise easier by using a lighter dumbbell, by performing regular renegade rows (body in a plank position), or by performing modified regular renegade rows where the hands are elevated on a box, bench, or other surface.
Progression:
Make this exercise more challenging by using a heavier dumbbell.
#2) Roller Roll-Outs + Scapular Protraction
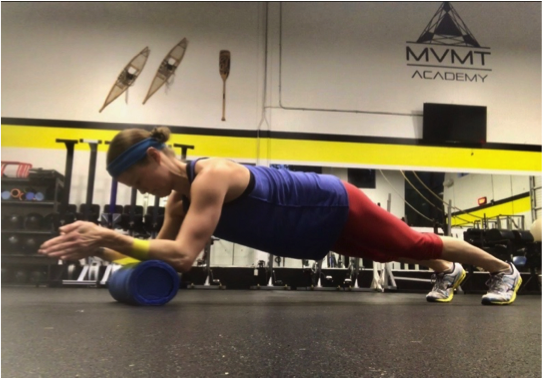
This innovative exercise develops shoulder and scapular controlled mobility, and lumbo-pelvic stability.
While I am performing this exercise using a roller, you may also use a stability ball.
Coaching Tips:
- Place a resistance band around your forearms, and place your forearms so they are on a roller.
- Set your body so it is in a straight line from your head to heels, tuck your chin, and keep your neck in neutral alignment.
- Now lightly press your forearms out against the band, and retract your shoulder blades. In other words, your shoulder blades should move away from your spine. Keep them protracted for the duration of the exercise.
- Before each rep, take a deep breath in (360 degrees of air around your spine), brace your core (360 degree brace around your spine), tuck your ribs towards your hips (close the space in your midsection), and squeeze your glutes. This will help stabilize your pelvis and spine.
- Now roll the roller forward, and to a range where you are able to maintain proper form. Once you hit your end range, perform the reverse movement and roll the roller back to the starting position.
- Do not keep your shoulder blades pinned. They are meant to move.
- For the duration of the exercise, your head, torso, and hips should remain in a stacked position. Do not let your lower back hyperextend, ribs flare, torso or hips rotate, weight shift from foot to foot, and do not let your hips pike or collapse.
- Steadily exhale as you are rolling the roller away from your body. Inhale as the roller is travelling back towards your body, or pause in the starting position, and inhale/reset there before the next rep. Figure out what works and feels best for you.
Regression:
Make this exercise easier by performing it from the knees and with a stability ball, or by using a band with less tension.
Progression:
Make this exercise more challenging by increasing your range of motion, or by using a band with more tension.
#3) Tall Kneeling Overhead Barbell Holds With Hanging Kettlebells

This exercise develops shoulder and scapular stability (your shoulders and scapulae are in a fixed position), lumbo-pelvic stability, and to some extent, grip strength. The very unstable nature of the hanging kettlebells makes this exercise extremely challenging.
Coaching Tips:
- Attach a band to 2 separate kettlebells, and hang the band from either end of the barbell.
- Set up the barbell so it is in a squat rack and at an overhead level so you don’t need to press the barbell into the starting position (this will usually allow you to use more resistance); or you can press the barbell into the starting position. If you are starting from the ground, make sure that you use proper form as you get the barbell into the starting position.
- Grab onto the barbell so your palms are facing away from you (pronated). Adopt a hand width that works and feels best for you.
- Before you go, take a deep breath in (360 degrees of air around your spine), brace your core (360 degree brace around your spine), tuck your ribs towards your hips (close the space in your midsection), and squeeze your glutes. This will help stabilize your pelvis and spine.
- Now press the barbell so it is overhead. Your arms should be in a vertical position, and your elbows extended (but not hyperextended).
- Do not move the weight overhead by hyperextending your lower back and flaring your ribcage, or excessively shrugging.
- Once the barbell is in the overhead position, draw each shoulder blade in towards the spine and down towards the opposite hip and keep them in this position for the duration of the exercise. Hold for the targeted amount of time.
- For the duration of the exercise, your head, torso and hips should remain in a stacked position. Do not allow your lower back to hyperextend, ribcage to flare, or your torso or hips to rotate. Do not allow the barbell to drift ahead or behind of your body.
- For the duration of the exercise, keep taking deep breaths in through your nose (360 degrees of air around your spine) and steadily exhale through your mouth.
Regression:
Make this exercise easier by using lighter kettlebells, by using thicker and shorter bands, or by using just the barbell.
Progression:
Make this exercise more challenging by using heavier kettlebells, or by using thinner and longer bands.
#4) Bird Dog Hold From Hand And Foot + Single Arm Rows (with fat gripz)
This badass bird dog variation develops shoulder and scapular controlled mobility on side that is performing the rowing movement, shoulder and scapular stability on the side that is planted, lumbo-pelvic stability, and to some extent, grip strength.
With this exercise, you will elevate your hands and feet on two benches, hold the bird dog position from your hand and foot, and perform single arm dumbbell rows. I also put on a fat gripz as this requires more grip strength. Before you perform this variation, make sure you have mastered the basic bird dog variation.
Coaching Tips:
- Place one foot on a bench, and place the hand of the opposite side of your body on the bench. Make sure that your shoulder is directly above your hand. Spread your fingers, and pretend you are suctioning your hand to the bench.
- Extend your leg on the opposite side of your body as the rowing arm so it’s backwards and is parallel to the ground.
- Set your body so your head, torso, hips, and leg are in a stacked position, and maintain this position for the duration of the exercise.
- Before you initiate the row, take a deep breath in (360 degrees of air around your spine), brace your core (360 degree brace around your spine), tuck your ribs towards your hips (close the space in your midsection), and squeeze your glutes. This will help stabilize your pelvis and spine.
- Initiate the movement by using the muscles in your mid and upper back and draw your shoulder blade in towards the spine (retract). Do not initiate the movement with your arm, and do not use momentum.
- Do not allow your elbow to flare out; instead keep it close to your side.
- Lower the weight with control, and make sure you keep your shoulder from collapsing. During the lowering/eccentric component, do not keep your shoulder blade pinned. It is meant to move, and should perform the reverse movement (protraction) as it did during the rowing/concentric component.
- Pay attention to your non-working/supporting side. Push away from the bench and protract your shoulder blade. Do not mindlessly hang out.
- For the duration of the exercise, your head, torso, hips, and leg should remain in a stacked position. Do not allow your lower back to hyperextend or round, ribcage to flare, hips to collapse or pike, neck to collapse, or your torso or hips to rotate.
- Aside from the rowing arm/shoulder blade, your entire body should remain in a relatively fixed position.
- Figure out what breathing works and feels best for you.
Regression:
Make this exercise easier by using a lighter dumbbell.
Progression:
Make this exercise more challenging by using a heavier dumbbell.
#5) Corner Rack Pull-Ups With Lateral Band Tension
I got this awesome pull-up variation from Nick Nilsson. These are for people who can already perform pull-ups, and are looking to take their pull-ups to another level. With this exercise, you will place a resistance band just below your hands, and will grip the bars on the corners of the squat rack. For the duration of the exercise, you will press your arms laterally against the band, and will also press your body away from the bars. This variation absolutely torches the lats and is no joke!
Coaching Tips:
- Place a resistance band around your wrists, and grab onto the corner bars of a squat rack. If you don’t have this option, you can use a straight bar.
- Set your body so it is in a relatively straight line from your head to feet (or adopt a slight hollow body position). Take a deep breath in (360 degrees of air around your spine), brace your core (360 degree brace around your spine), tuck your ribs towards your hips (close the space in your midsection), squeeze your glutes, straighten your knees, contract your quads, and dorsiflex your feet (you may cross one foot over the other). This will help stabilize your pelvis, spine, and legs, and will help prevent you from swinging.
- For the duration of the exercise, press your wrists laterally against the band, and press your body away from the rack/bars.
- Initiate the movement by using the muscles in your mid and upper back and draw your shoulder blades together and down (bring each shoulder blade in towards the spine and down towards the opposite hip), and drive your elbows in towards your sides and down towards the floor so you are in the top position of the pull-up. Do not lead the movement with your arms, and do not allow your elbows to flare. They should remain at approximately a 45 degree angle with your torso, similar to the bottom position of an overhead press.
- Make sure that your chin passes the bars, but do not look up and reach with your chin.
- Lower yourself to the bottom position with control. During the lowering/eccentric component, do not keep your shoulder blades pinned. They are meant to move, and should perform the reverse movements as they did during the ascending/concentric component.
- In the bottom position, your elbows should be close to fully extended, but not hyperextended.
- For the duration of the exercise, your head, torso, and hips should remain in a stacked position. Do not allow your lower back to hyperextend or ribcage to flare.
- Before you initiate the next rep, make sure that you re-establish the proper full body positioning and requisite levels of tension and stability.
- Exhale just after you have initiated the “pull” and have drawn your shoulder blades together and down; you may inhale and “reset” as you are descending, or do a full reset when you are in the bottom position. Figure out what works and feels best for you.
- For the duration of the exercise, do not allow the band to lose tension.
Regression:
Make this exercise easier by using a band with less tension, or by using no band.
Progression:
Make this exercise more challenging by using a band with more tension, or by performing negative reps and taking 3-5 seconds to lower your body to the starting position.
About the Author

Meghan Callaway is a strength coach in Vancouver, Canada with over 15 years of experience coaching a wide array of clients from elite athletes, to post-physical therapy rehabilitative strength training, as well as everyday people who want to feel, perform, and function at a higher level.
Meghan is the creator of the Ultimate Pull-Up Program, and believes that working out should be fun, mentally and physically rewarding, and empowering. Her pull-up program is currently being followed by over 1000 women and men worldwide.
The Ultimate Pullup Program is on sale for 50% off until October 27th at midnight, so get your copy while you can save some money.
Click HERE for more info and to purchase